Mini Program User Guide
I. Mini Program Login
(I) Account and Password Login
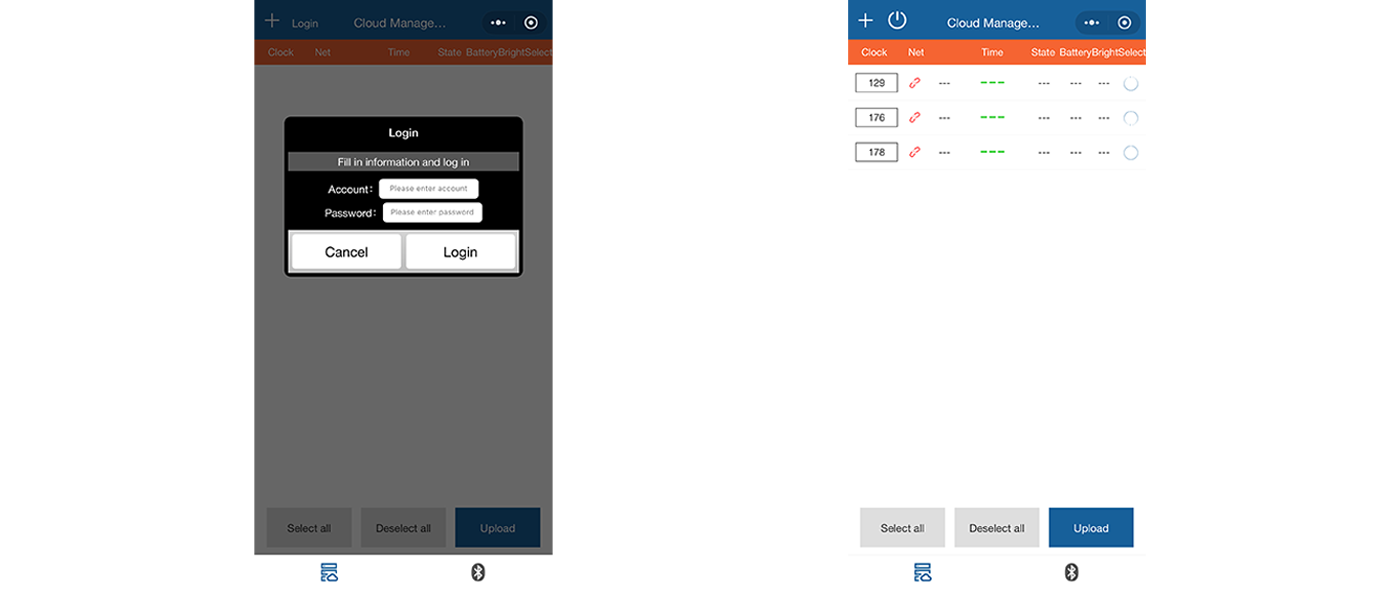
Figure 1.1: Account Password Login Page & All Clocks Belong to the Account Page
Click the "Login" button in the upper left corner of the page, enter your account and password to access the mini program. After logging in successfully, the cloud management page will display all the clocks associated with the account.

(II) Password Login
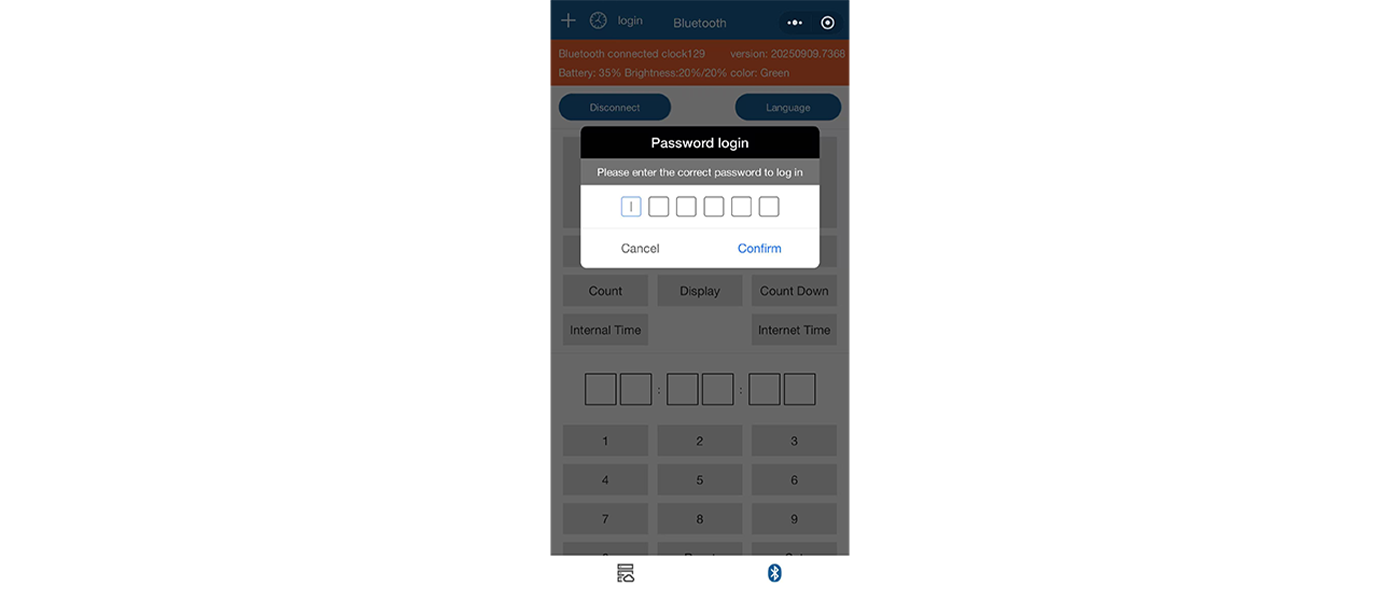
Figure 1.2: Password Login Page
Click the Bluetooth icon in the lower-right corner to switch to the Bluetooth control page, then click the "login" button in the upper left corner. Enter the password generated by the Run8 Cloud timing backend to access the mini program. Note: The password login method can only be used with the Bluetooth control feature.

II. Network Setup Guide
(I) Page Introduction
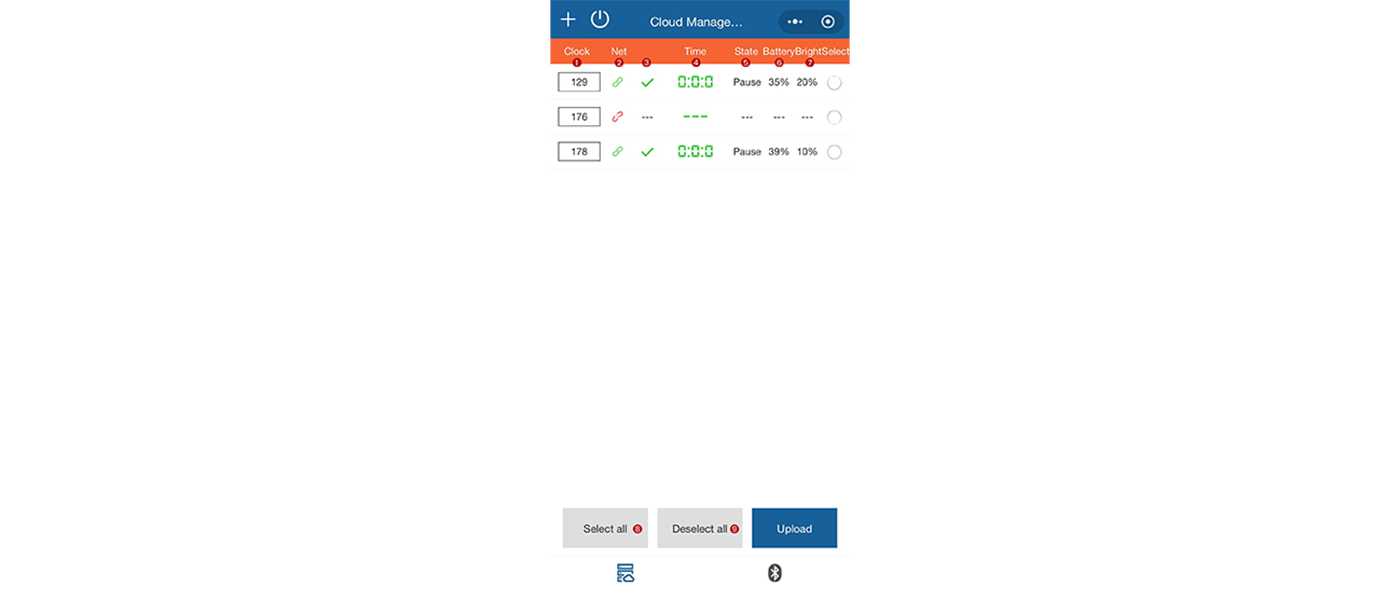
Figure 2.1: Cloud Management Page
1. Clock: The IDs of all the clocks under the current account.
2. Net: Green indicates the clock is connected to the network properly, while red indicates the clock is not connected to the network.
3. Time Synchronization: Use Bluetooth to synchronize the clock with the mobile device's reference time. A green "√" indicates successful synchronization. After synchronization, you can perform the "Clone" operation on the clock. Clocks that have not been synchronized cannot perform the "Cloud Clone" operation.
4. Time: The time displayed on the current clock's dial.
5. State: The current timing status of the clock: count-up, countdown, or paused.
6. Battery: The current battery level of the clock.
7. Bright: The brightness of the clock's LED lights.
8. Select all: Select all clocks that are connected to the network.
9. Deselect all: Deselect all clocks that are connected to the network.

(II) Basic Feature Settings
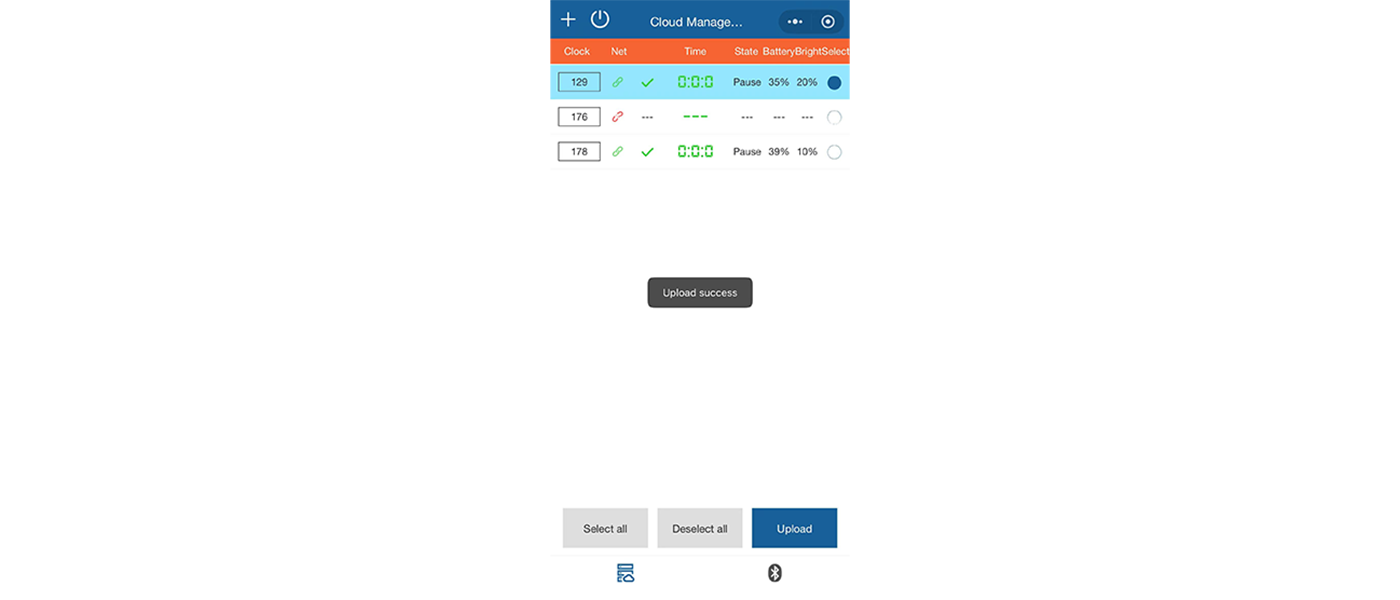
Figure 2.2: Clock Upload & Upload Success Page
1. Select the clock you want to control and click the "Upload" button. After the "Upload success" message appears, the background color of the corresponding clock will turn blue. At this point, you can perform operations such as "Cloud Sleep," "Cloud Awakening," or "Cloud Clone" on the clock.
2. Click the number of the clock you want to control individually (e.g., 129) to enter its settings page.
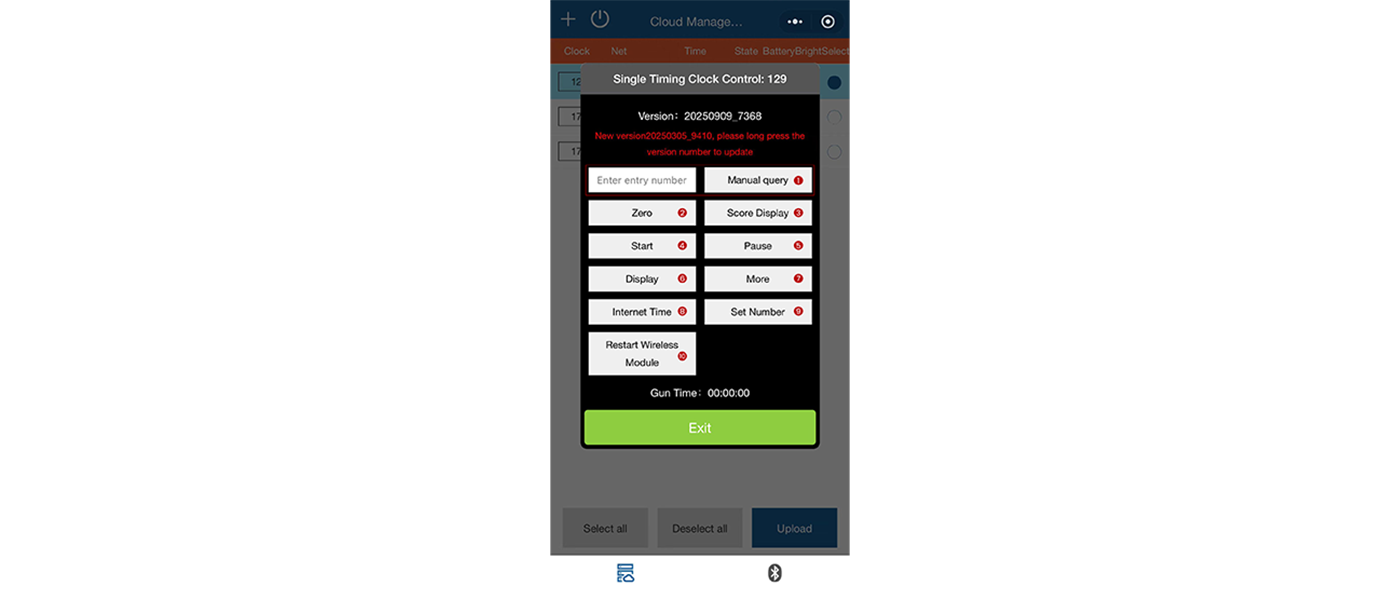
Figure 2.3: Single Clock Setting Page
(1) Manual Result Query: Enter the participant's entry number manually in the input box and click the "Manual query" button to retrieve the corresponding finishing result. Note: This feature only supports events timed by the Run8 Cloud timing backend.
(2) Zero: Resets the clock to zero.

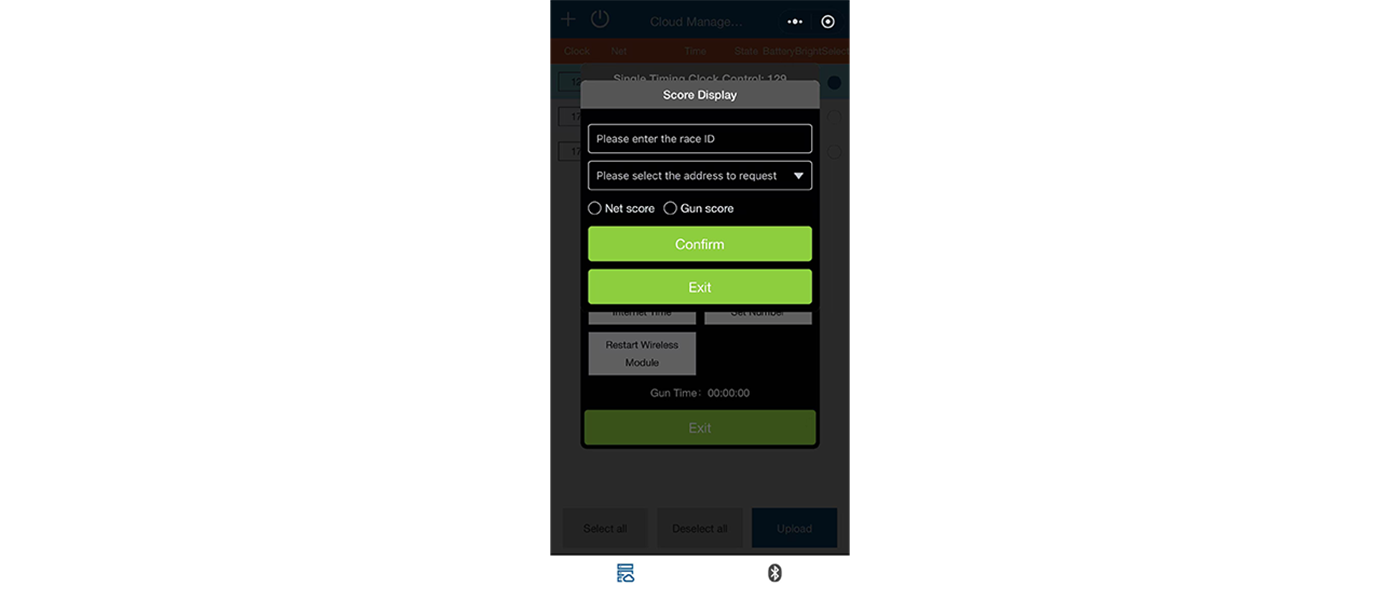
Figure 2.4: Score Display Settings Page
(3) Score Display: On this page, you can enter the event ID and the corresponding query address, and choose to display either "Net score" or "Gun score." After completing the settings, you can use the manual query feature (1) or use a USB reader connected to the clock to read the timing chip and display the corresponding finishing result.
(4) Start: The clock starts timing.
(5) Pause: The clock pauses timing.
(6) Display
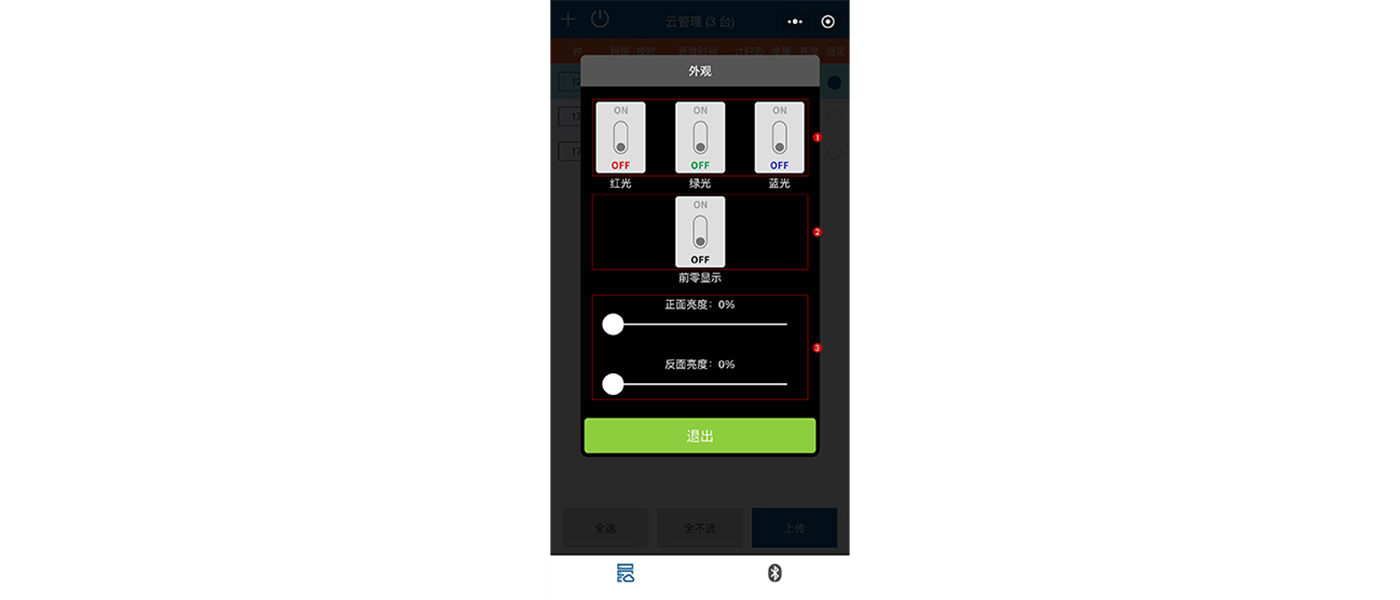
Figure 2.5: Display Settings Page
- A. Color Adjustment: Adjust the color of the clock LEDs by enabling individual "Red," "Green," or "Blue" buttons, or by turning on multiple colors simultaneously.
- B. Front Zero Show: When enabled, the hour and minute digits remain constantly lit. When disabled, the hour and minute digits are hidden, and only appear when seconds carry over to the next minute.
- C. Brightness Adjustment: Drag the slider left or right to adjust the brightness of the front LED or back LED of the clock.


Figure 2.6: Plus/Minus Time Settings Page
(7) More: In the "Count-up" mode, input the number of seconds or milliseconds to add or subtract, then click the "Plus" or "Minus" button to adjust the clock.
(8) Internet Time: The clock will show the current Beijing time. (In the English version, this can be translated as "Display Internet Time.")

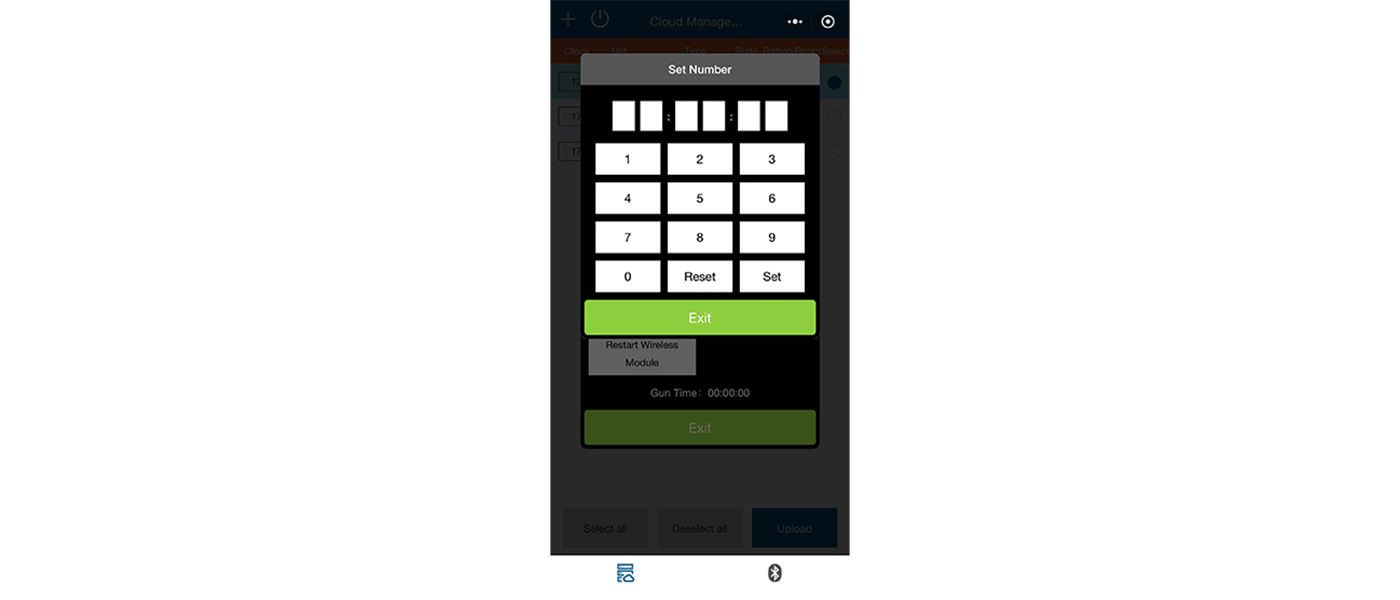
Figure 2.7: Set Number Page
(9) Set Number: Enter the time you want the clock to display, then click the "Set" button. The clock will display the set time. Note: The input time must be in the correct format. Invalid time formats cannot be set (e.g., 12:60:61.)
(10) Restart Wireless Module: The clock's internal wireless module will power cycle. The display information on the clock will remain unchanged.

(III) Cloud Control Clock
In the timing state, the clock cannot receive commands like sleep or wake-up. Therefore, to use the following features, you first need to reset the clock to zero.
1. Cloud Sleep: The clock enters sleeping mode, all LED lights are turned off, and only the time separator is displayed.
2. Cloud Awakening: The clock enters working mode, all LED lights are turned on.
3. Cloud Clone: Synchronize the time displayed on the "Master Clock" to multiple clocks.
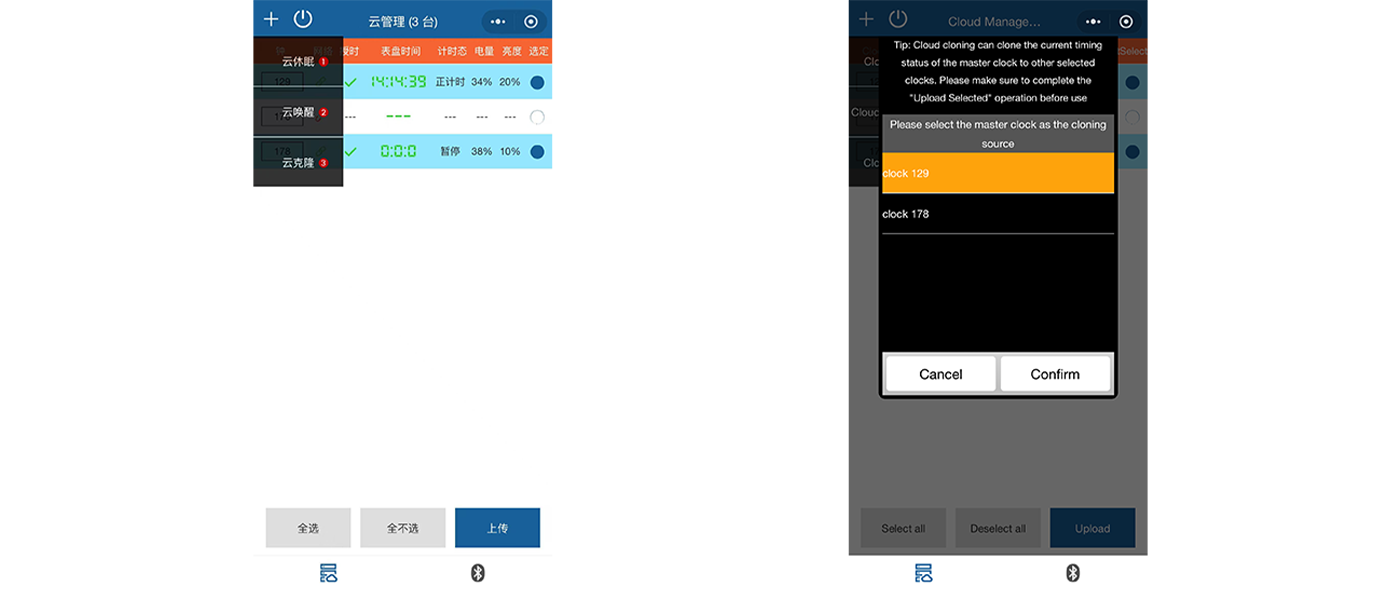
Figure 2.8: "Cloud Clone" Operation Process Page
(1) Step1: Select the clocks to synchronize and click the "Upload" button.
(2) Step2: Click the "+" button at the top left of the page and select the "Cloud Clone" option.
(3) Step3: Choose the master clock to be used as the cloning source and click the "Confirm" button.
(4) Step4: After setup, select the multiple clocks to clone and ensure their time matches the master clock. (Both the master clock and the cloned clocks must be in the authorized state to use the clone feature.)

III. Bluetooth Setup Guide
(I) Bluetooth Connection
Before connecting via Bluetooth, please ensure that the Bluetooth on your mobile device is turned on.
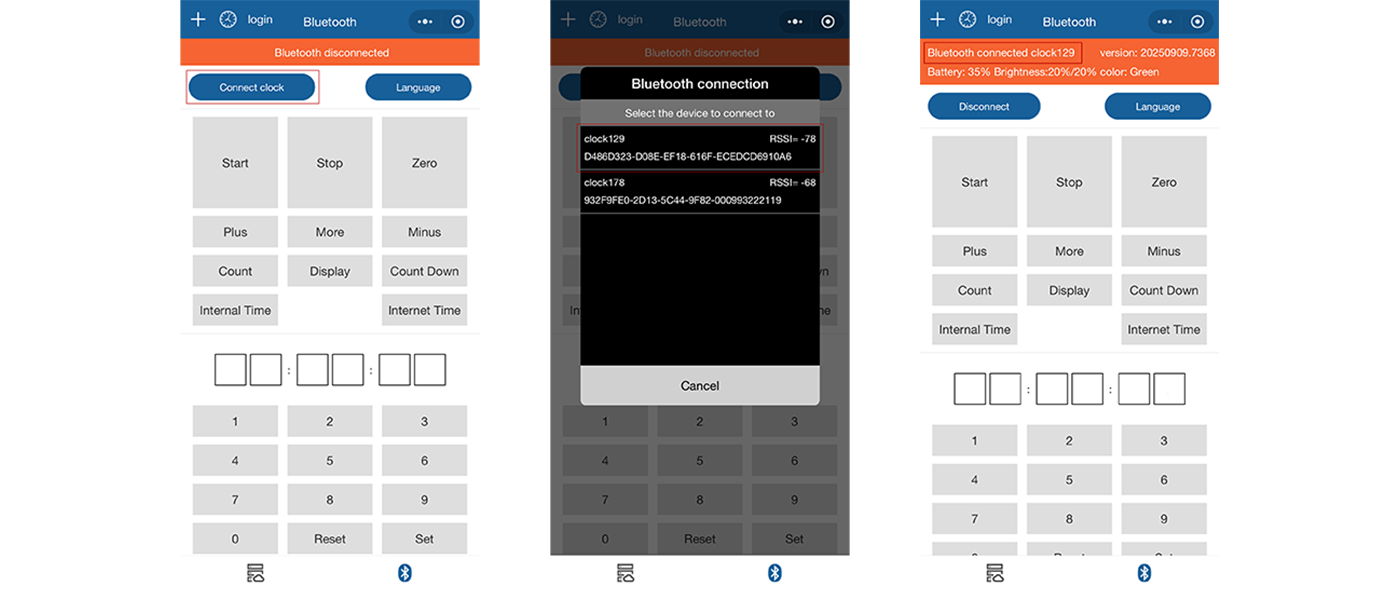
Figure 3.1: Bluetooth Connection Clock Operation Flow Page
1. Step1: Click the "Connect clock" button in the top left corner of the page.
2. Step2: Select the clock you want to connect to.
3. Step3: After a successful connection, the relevant information of the connected clock will be displayed in the orange box on the page.

(II) Basic Feature Settings
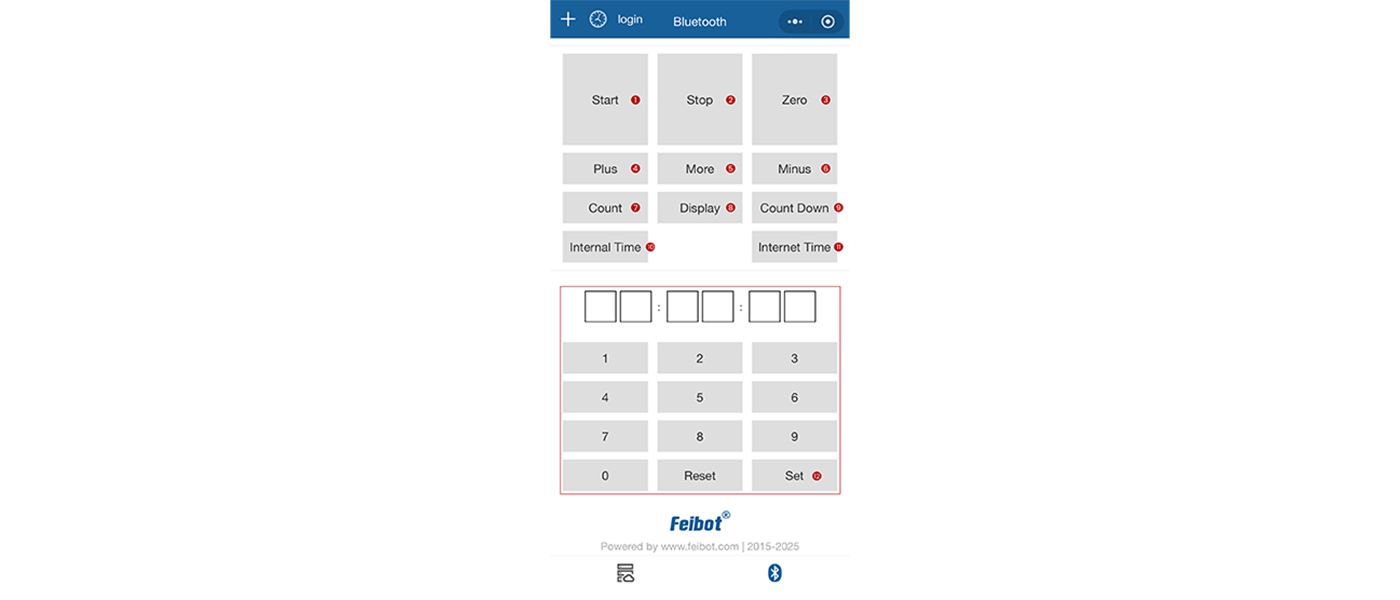
Figure 3.2: Bluetooth Basic Feature Settings Page
1. Start: The clock starts counting up.
2. Stop: The clock stops counting.
3. Zero: The clock time is reset to zero.
4. Plus: Add one second to the current clock state. This can be done while the clock is stationary or while it's counting.

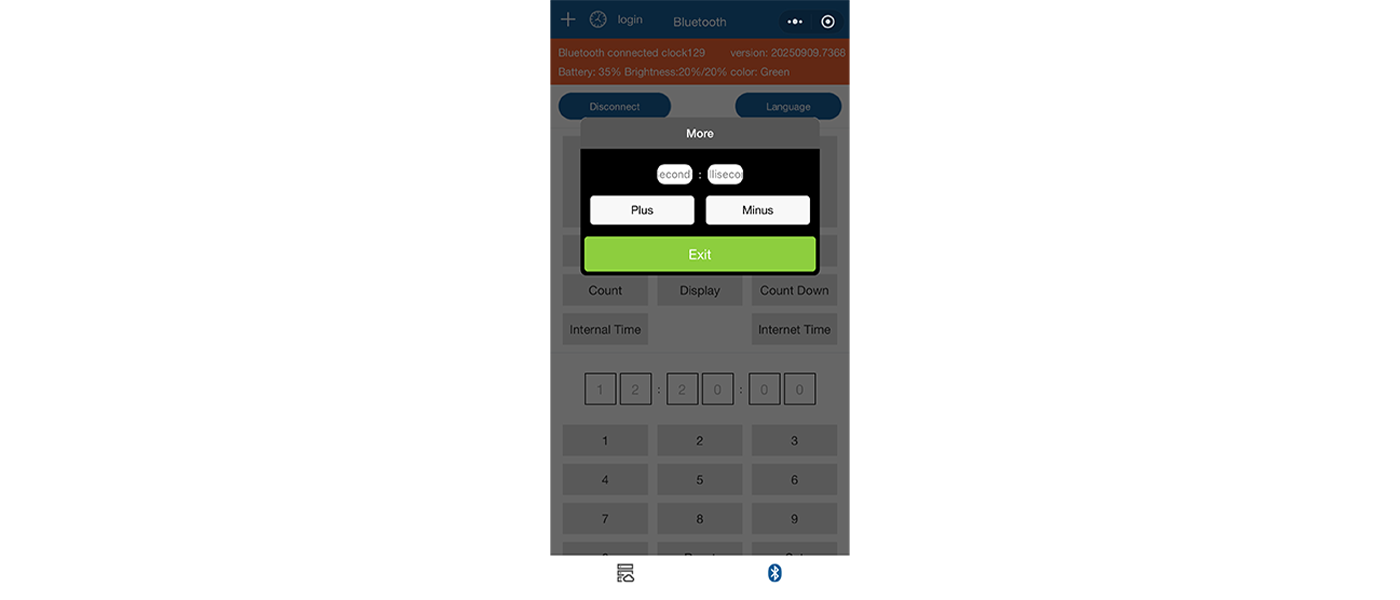
Figure 3.3: Plus/Minus Time Settings Page
5. More: In the "Count-up" mode, input the number of seconds or milliseconds to add or subtract, then click the "Plus" or "Minus" button to adjust the clock.
6. Minus: Subtract one second from the current clock state. This can be done while the clock is stationary or while it's counting.
7. Count: The clock starts counting from zero or from the set display time, with the time increasing.
8. Display
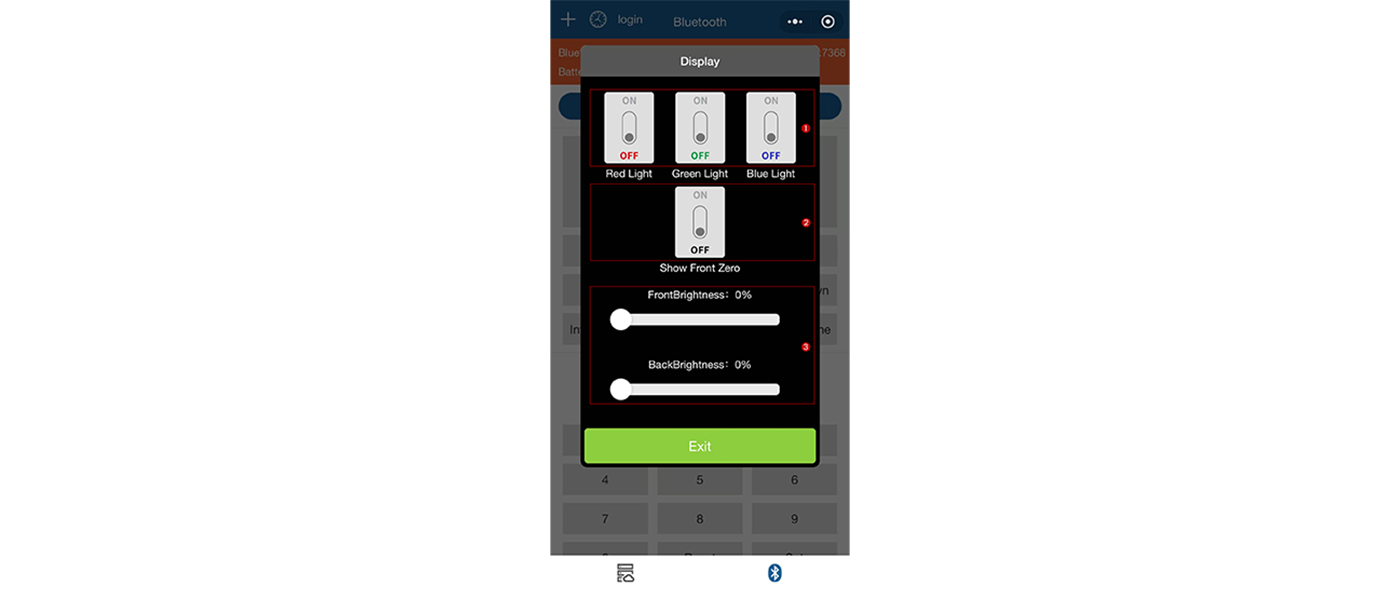
Figure 3.4: Display Settings Page
- A. Color Adjustment: Adjust the color of the clock LEDs by enabling individual "Red," "Green," or "Blue" buttons, or by turning on multiple colors simultaneously.
- B. Front Zero Show: When enabled, the hour and minute digits remain constantly lit. When disabled, the hour and minute digits are hidden, and only appear when seconds carry over to the next minute.
- C. Brightness Adjustment: Drag the slider left or right to adjust the brightness of the front LED or back LED of the clock.

9. Count Down: The clock starts a countdown from the current time.
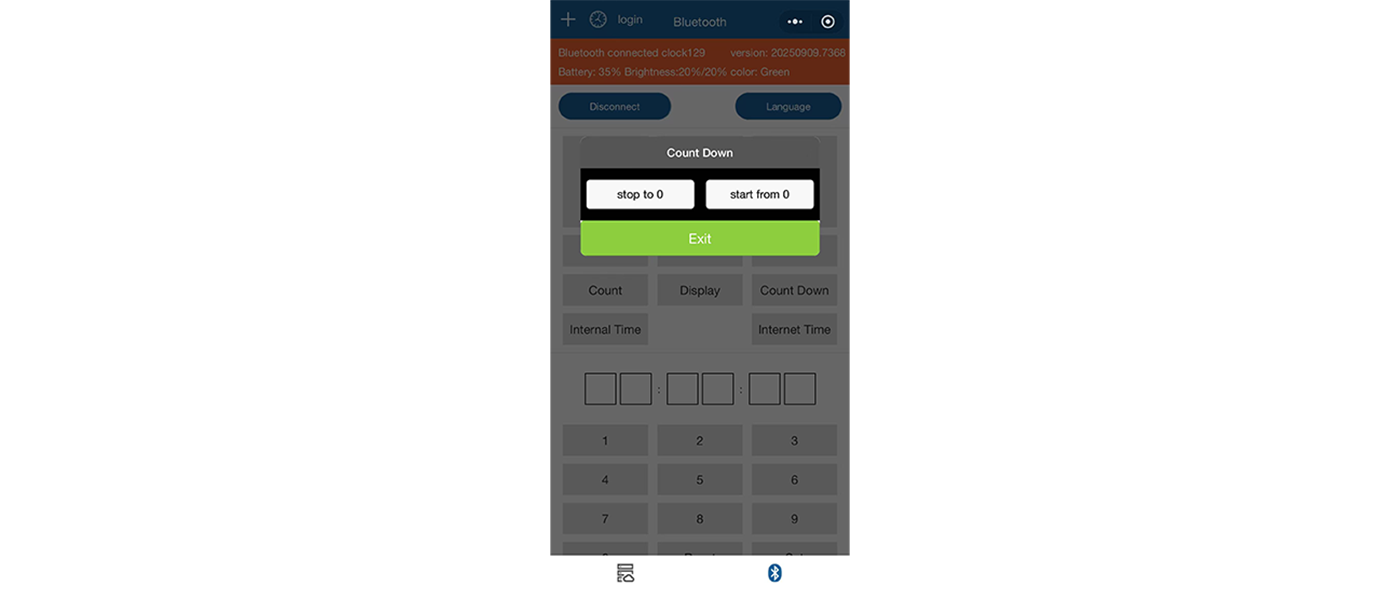
Figure 3.5: Count Down Settings Page
- Stop to 0: The clock stops when it reaches 0:00:00.
- Start from 0: The clock starts counting up when it reaches 0:00:00.
- Note: The countdown time setting must not be earlier than the current time. For example, if the current time is 10:00:00 Beijing Time, the countdown time should be set to a time after 10:00:00. Setting it to 8:00:00 would not meet the requirements.
10. Internal Time: The clock displays the elapsed time from the last synchronization to the current moment.
11. Internet Time: The clock will display the current internet time.
12. Set Number: Enter the time you want the clock to display, then click the "Set" button. The clock will display the set time. Note: The input time must be in the correct format. Invalid time formats cannot be set (e.g., 12:60:61.)

(III) Other Feature Settings

Figure 3.6: Other Feature Settings Page
1. Sleep: The clock enters sleeping mode, and all LED light beads turn off, displaying only the time separator.
2. Awaken: The clock enters working mode, and all LED light beads light up. Note: The clock cannot execute the sleep/wake-up command while in timing mode. To activate sleep/wake-up mode, you need to pause or reset the clock beforehand.
3. Count Down To: Set the target time for the clock. After selecting this option, the clock will count down to the set time, and once the countdown reaches the target, it will reset to zero and begin counting forward. For example, if an event is scheduled to start at 8:00:00 AM, set the target time to 8:00:00, and the set time should be later than the current time. When the clock reaches 8:00:00, it will reset to zero and begin counting up.
4. **:**:**: Sync the mobile device's time with the clock. This time sync feature can only be set via Bluetooth.
5. Mechanical Clock: This is compatible with a special operation for another mechanical clock, but does not affect the LED clock.
6. Display Mode Change: Switch the clock carry mode: Hour : Minute : Second / Minute : Second : Millisecond.
7. Reset Wireless Module: The wireless module inside the clock will be powered off and on again. The information displayed on the clock will not change.

IV. Other Operations
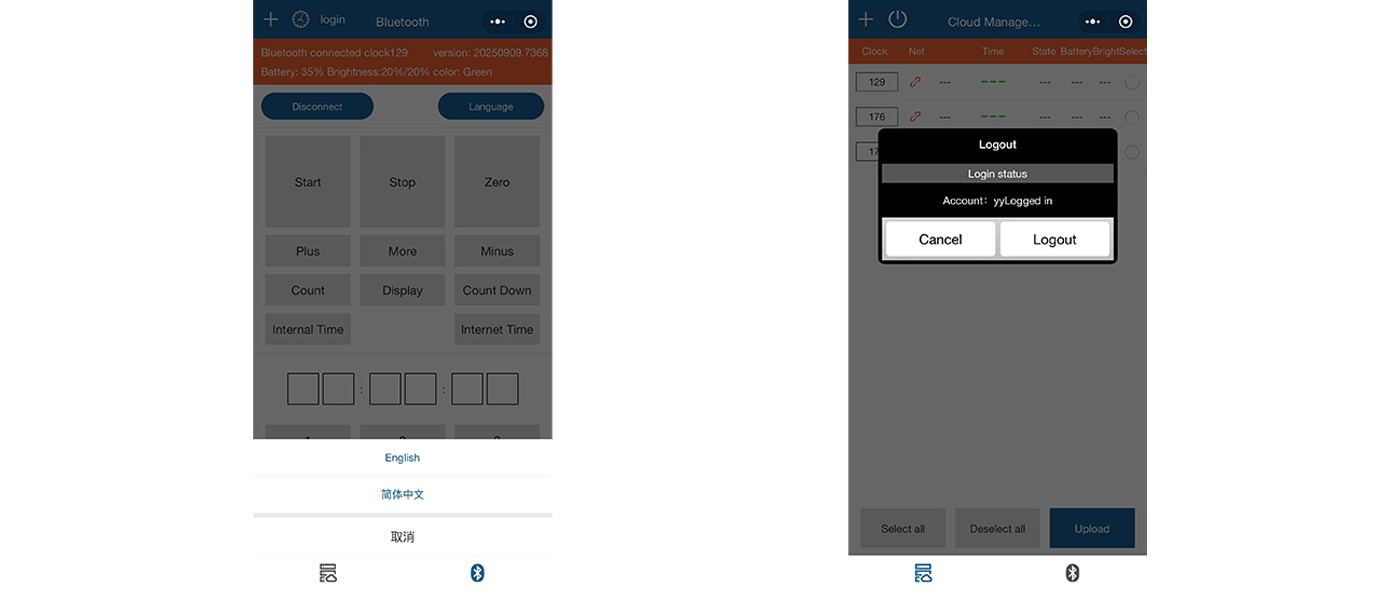
Figure 4.1: Language Switch Page (left) / Logout Page (right)
1. Language Switch: Enter the Bluetooth control page and click the "Language" button in the top-right corner of the page to switch between "Chinese" and "English."
2. Logout: Enter the cloud management page and click the "Power" icon in the top-left corner of the page to logout.

Remote Control User Guide
I. Accessories and Connection
(I) Accessories
Remote control, LED clock, four-pin plug connection cable.
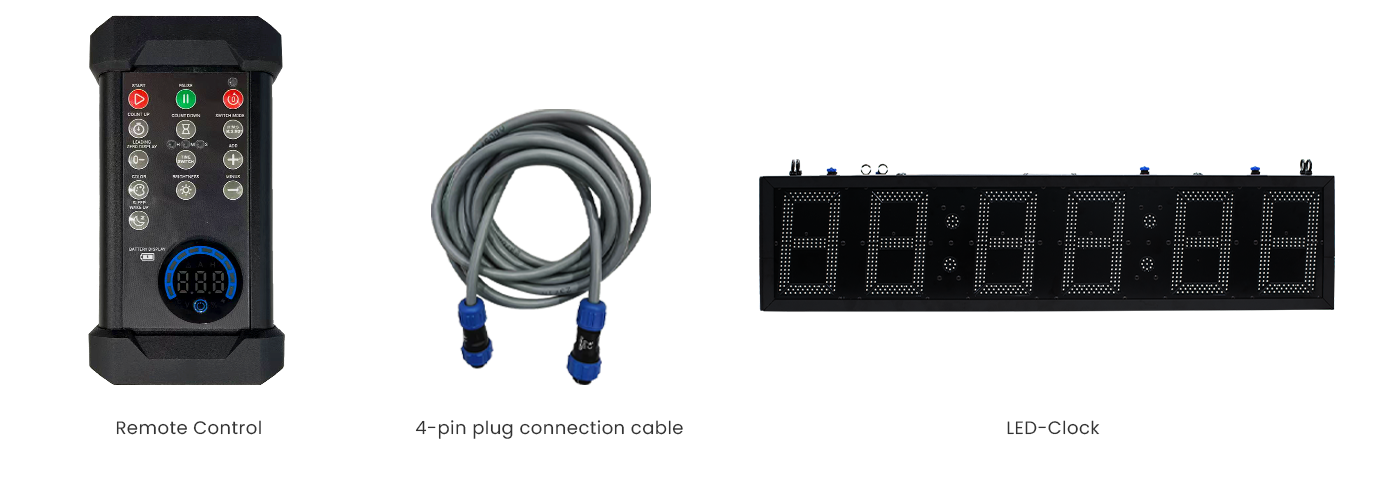
Figure 1.1: Accessories required for the remote control of the LED clock

(II) Connection Method
Connect both ends of the connection cable with the four-pin plug to the port of the remote control's top interface and the port of the clock's side panel interface. Once connected successfully, turn on the clock, and the remote control can be used for operation.

Figure 1.2: Schematic diagram of the connection between the remote control and the LED clock

II. Basic Feature Settings

Figure 2.1: Remote control feature panel
1. START: The clock starts counting up.
2. PAUSE: The clock stops counting.
3. ZERO: The clock time is reset to zero.
4. COUNT UP: Add one second to the current clock state. This can be done while the clock is stationary or while it's counting. The specific operation is as follows: Press the "COUNT UP" button, then press the "+" button on the right to add the seconds.
5. COUNT DOWN: Subtract one second from the current clock state. This can be done while the clock is stationary or while it's counting. The specific operation is as follows: Press the "COUNT DOWN" button, then press the "-" button on the right to subtract the seconds.
6. SWITCH MODE: Switch the clock carry mode: Hour : Minute : Second / Minute : Second : Millisecond.
7. LEADING ZERO DISPLAY: When enabled, the hour and minute digits remain constantly lit. When disabled, the hour and minute digits are hidden, and only appear when seconds carry over to the next minute.
8. TIME SWITCH: Press the "TIME SWITCH" button, the red light on the seconds display will turn on. Press the "+" or "-" buttons on the right to add or subtract the seconds. Press the "TIME SWITCH" button again, the blue light on the minutes display will turn on. Press the "+" or "-" buttons on the right to add or subtract the minutes. Press the "TIME SWITCH" button once more, the green light on the hours display will turn on. Press the "+" or "-" buttons on the right to add or subtract the hours. Note: If you only need to adjust the time for a specific unit, you can switch between the units by pressing the "TIME SWITCH" button multiple times.
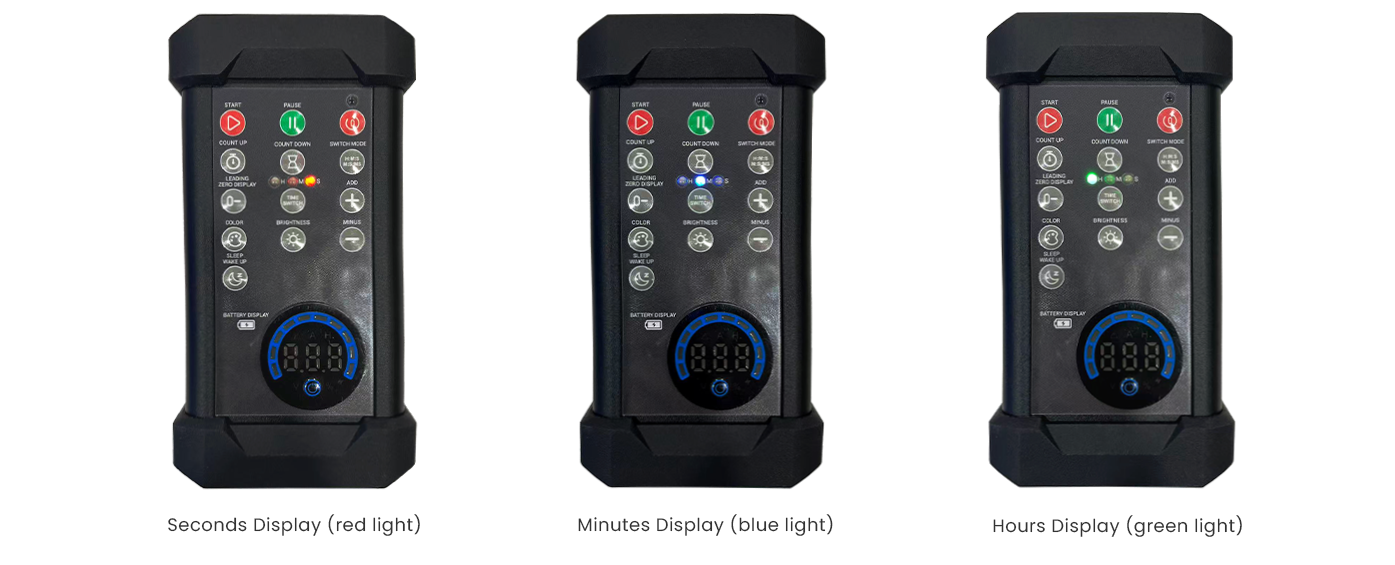
Figure 2.2: Schematic diagram for adjusting different timing digits

9. COLOR ADJUSTMENT: Press the "COLOR" button to adjust the color of the clock's LED lights.
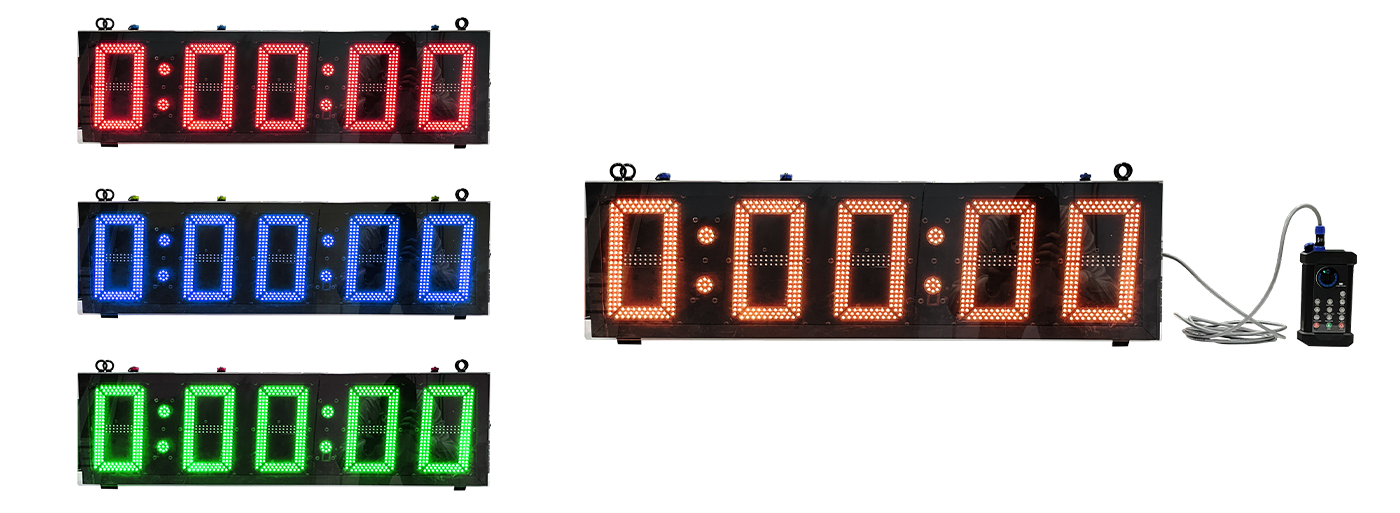
Figure 2.3: Schematic diagram of the color adjustment for the clock

10. BRIGHTNESS ADJUSTMENT: Press the "BRIGHTNESS" button. The three display lights above the "TIME SWITCH" button will all light up, allowing you to adjust the brightness of the front LED light beads of the clock. Press the "BRIGHTNESS" button again, and the three display lights above the "TIME SWITCH" button will turn off, allowing you to adjust the brightness of the back LED light beads of the clock. Press the "+" or "-" buttons on the right side to adjust the brightness of the clock.
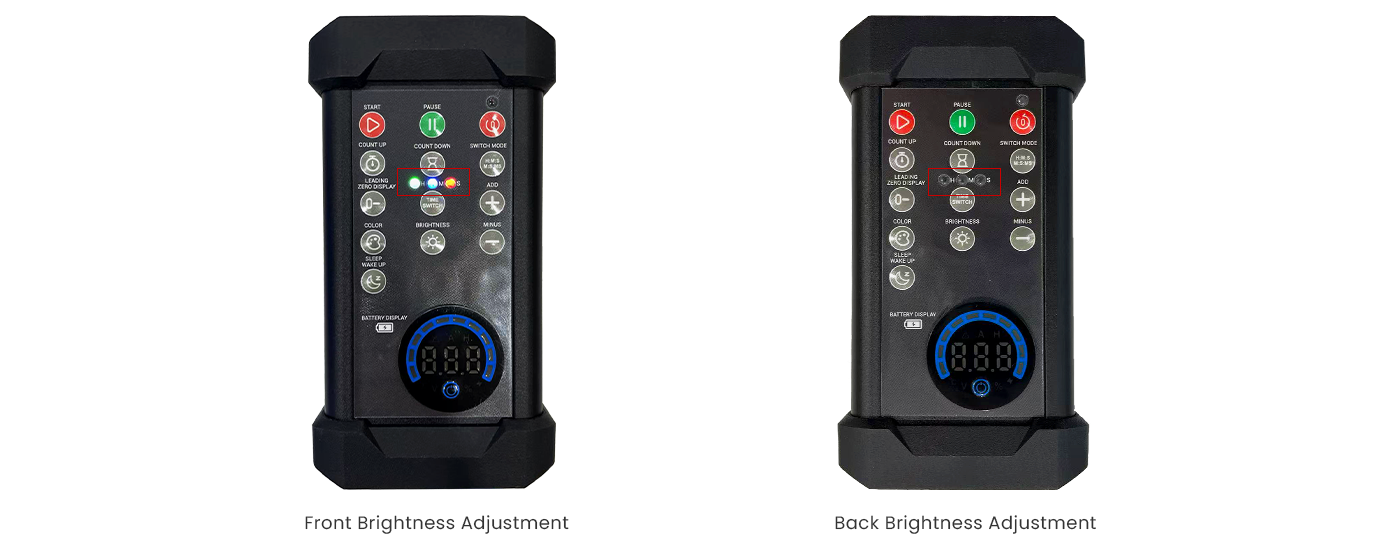
Figure 2.4: Schematic diagram for front/back brightness adjustment of the clock

11. SLEEP/WAKE UP: Press the "SLEEP/WAKE UP" button, the clock enters sleeping mode, and all LED light beads turn off, displaying only the time separator. Press the "SLEEP/WAKE UP" button again, the clock enters working mode, and all LED light beads light up. Note: The sleep/wake-up feature cannot be executed while the clock in timing mode. To activate sleep/wake-up mode, the clock needs to be paused or reset beforehand.
12. BATTERY DISPLAY: The display screen shows the current battery level of the clock. Press the "POWER" button to control whether the battery level is displayed.
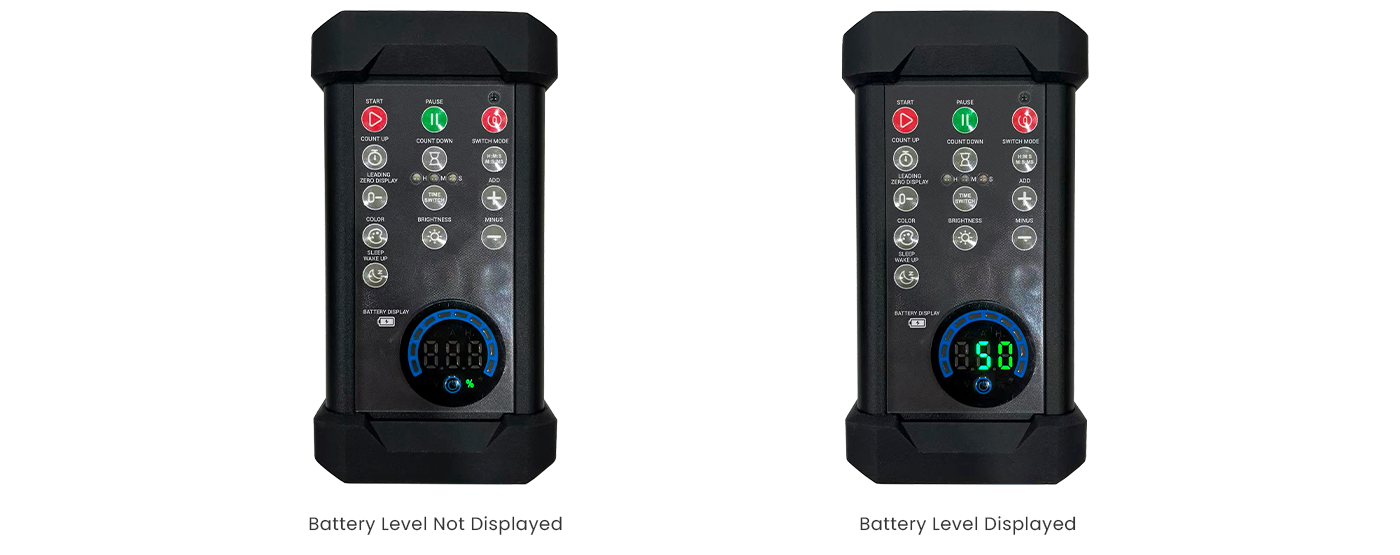
Figure 2.5: Schematic diagram of the battery level display for the clock
